|
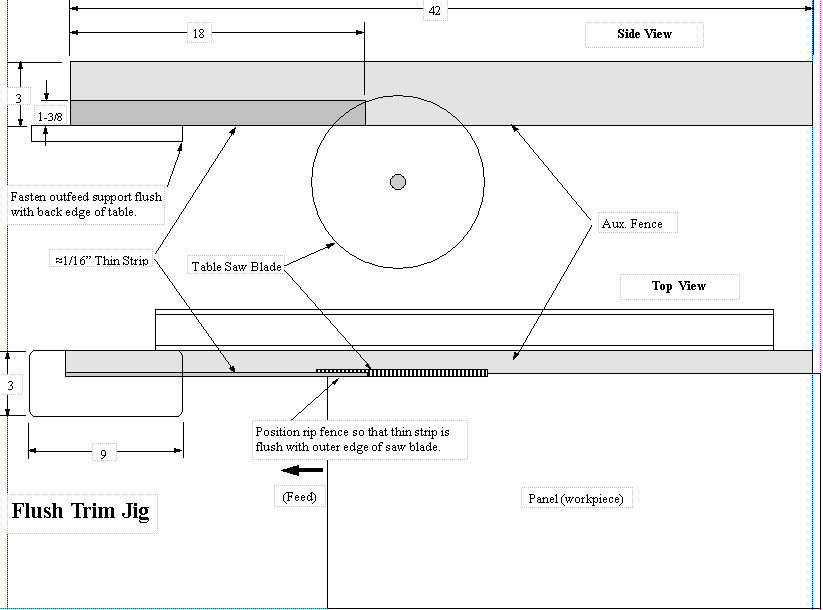
I like to cut panels a bit oversize initially and then flush trim them to final size. However, trimming the edges of panels has always been a challenge for me using the table saw, especially when the long side of the panel exceeds the saw's rip capacity (usually about 24" for most saws) or the side to be trimmed exceeds the capacity of my panel cut-off jig. Even when using saws with table extensions, it is difficult because I have to position the fence so far away from the blade. Usually the only option is to switch to a circular saw and use clamps, a straight edge, and a framing square--cumbersome, to say the least. Therefore, I designed a flush trim jig for the table saw that solves the problem. My flush trim jig starts with an auxiliary " hardwood fence the same height as the saw's fence but about 9" longer (about 42"). I selected the straightest piece of stock I could find. Then I ripped a thin, 1/8" hardwood strip 18" long from 5/4" stock and glued it onto the rear face of the fence, flush to the bottom. (See attached diagram.) After gluing the thin strip to the fence, I ran the assembly through my thickness planer to flatten the thin strip and take it down to about half the width of the saw blade. Then I lowered the blade all the way down and clamped the auxiliary fence to the saw's fence, overlapping it two inches at the front. That left an extra seven inches or so extending beyond the back. I attached a small outfeed support block to help with really large stock. Finally, with the outer edge of the blade lined up with the outer edge of the thin strip, I turned on the saw and raised the blade up about 1-3/4". That took out the front of the thin strip and left a slight crescent impression in the auxiliary fence. As a finishing touch, I beveled both the leading edge of the thin strip and the leading edge of the outfeed support with sandpaper, smoothed, and waxed them. Each time I use the jig, I start by using a square to align the outer edge of the blade, flush with the thin strip, and lock the fence. Then I feed the stock through, pressing against the fence and forward at the same time. The thin strip supports the work piece as it passes by and defines the amount of stock that I remove from the edge with each pass. Without the thin strip, the blade could pinch, burn the edge, or even stall out the motor. But with the thin strip, the jig works like magic with minimal burning. I also use this jig to bring ordinary rough stock to edge, similar to a jointer, and to flush trim the edges of small panels as well. But its true value lies in the way it handles large panels. With enough supports on the sides of the table, I have even used it to trim the bottoms of interior doors and panels nearly twice the capacity of my shop-made panel cut-off jig--whatever my roller stands and I can hold. Kindest regards, Edwin C. Hackleman |

|
Links: Notes & Comments: Stay tuned...   This site is maintained by: Good-Lyddon Data Systems Copyright © 2004-2005 Joe Lyddon, WoodWorkStuff.net |