I used a
2 part expoxy system on a table top this past summer,
FAMOWOOD
was the name, from local big box store.
I have purchased the Famowood at Lowes and Home Depot. HD offered
the kit in two sizes:
Small: Each part=16oz. (32 ounces after mixing).
Large: Each part=32 oz (64 ounces after mixing).
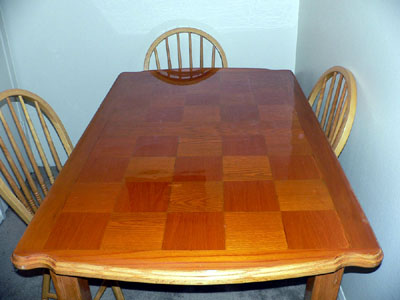
The table is 3' x 5' and we used a large kit and about 1/3 of
a small kit.
We used one of those thick plastic gallon size paint containers
found in the paint department, for mixing.
We made one mix consisting of a large kit and a small
kit knowing we would not need the entire mix.
1) READ THE DIRECTIONS PRIOR TO USE
2) Use a disposable plastic spreader / scraper
to spread the product on your surface immediately after the
pour.
3) Wear a pair of latex gloves to protect your
skin
4) You have to build a dam around the edges
prior to your pour. The blue painters tape works pretty
good.
5) Make sure the top surface is level, since
this is a self leveling product.
If top is not level you will have a thicker build on one side
as opposed to the other.
6) Place a disposable drop cloth beneath your
project in case the dam leaks, if you are not careful,
the whole pour could wind up on the floor, yes this is experience
speaking!
7) For the first 30 minutes after the pour you
will need to keep an eye on the surface, small tiny air bubbles
could come to the surface, they are easily popped by blowing gently
across them, I used my wife's hair dry on the lowest setting.
8) When mixing product stir gently to avoid
creating air bubbles
9) Be prepared to work quickly, this stuff
sets fast
10) Mix in a good container, this stuff will
melt a 16 oz. plastic drink cup, experience again!
The upside:
1) Table top looks like I have 100 coats
of poly on it after just 1 pour
2) Easy to work with
The downside:
1) When you remove the dam there will be very
sharp edges that require sanding or rounding over.
This leaves your clear coat very frosty looking.
The fix is simple but time consuming, wet sand with 1500 grit
until smooth and then finish using white and then blue pumice
sticks, if I remember correctly blue is finer than white.
2) If the product turns loose from the wood
due to mainly moisture or possible wood movement etc. the spot
will be very visible.
I have used this application several more times and will contiue
to do so as projects require.
Please practice on scrap wood prior to applying to actual
piece.
Gary
|
The table is 3' x 5' and we used a
large kit and about 1/3 of a small kit.
|

