|
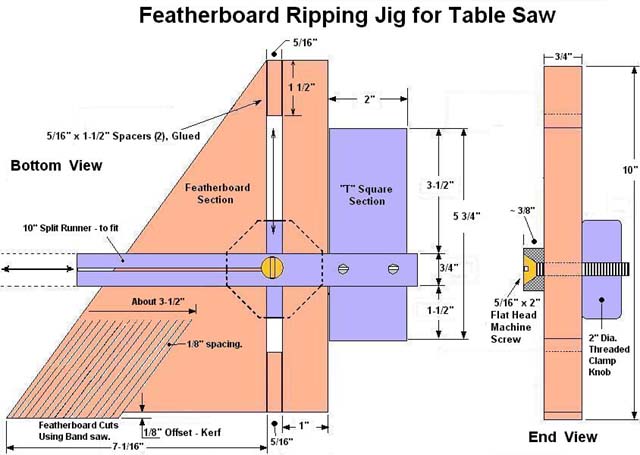
This Jig consists of two sections... 1. "T" Square. 2. Featherboard. There is a slot in the Featherboard section which allows it to be adjusted and tightened down to the T Square (carrier). The T Square section, besides holding the Featherboard in place, slides in the Table saw miter gauge slot. When the Featherboard is tightened, the split miter slot 'runner' will also be tightened into place; the screw head will cause the runner to expand from the slit, holding it secure in the slot. Here are the plans of a little wonder jig for the table saw that I have used not only for ripping long thin strips, but also for resawing and precision ripping. If I use this jig to make strips or any repetitive rips, my thickness planer hardly has a thing to do. I can get them to within 1/64" every time, sometimes even closer. A major feature is that in most instances, the thinner piece being saved is on the outside of the blade, not trapped between the fence and the blade. I originally made this jig to rip a whole bunch of 4/4x5-1/2" S4S hardwood into thirds with no waste so that only two passes were required with a thin-kerf rip blade. Then I flat glued all that up to make my workbench top--about 36 boards wide. It worked, and then I started using the same jig for lots of precision ripping--even jointing or rough-cut edge trimming. I carefully cut the feathers of this jig on the band saw with kerfs about 1/8" apart. It's best to use a fence and move it along, holding the same angle. The split runner locks in place with a 5/16" flat head (conical head) machine screw that squeezes out and thus locks it in the slot. The hole for the machine screw is right at the end of the split. Note that the featherboard is offset about one saw blade from the right stop. I cut all the feathers first and then clipped off the edge of the platform in front of them with a stopped cut on the TS, the same width as the blade. Finally, I used the band saw to complete this cut and the jig. When loose, the machine screw slides in the slot made by the two spacers that separate the two main pieces that form the top platform. You adjust the featherboard and stop left and right and then tighten the clamp knob to lock it to the slot. The conical head of the machine screw does the trick, splaying the forked runner. The flat surface trailing the featherboard serves as a stop block, parallel to the TS fence, and the working stock slides between it and the fence. Once locked, the stop block stays fixed as you move the fence from one cut to the next. In most cases, the feathers should stop just before the edge of the saw blade when locked into place. I cut thin strips to the left of the blade and save them, so most of the time, the saved stock is to the left of the blade and falls away harmlessly. I also joint the edge of rough stock by positioning the stop so that about 1/8" or less is sliced off per pass. In that case, the waste is to the left of the blade. Note that I can use this jig on both slots. To move to the other slot, I simply remove the top platform, and flip it so that the feathers always point towards the fence. It is important not to press the workpiece too tightly against the stop so that it won't bind against the fence during the pass. After you make this jig, you will wonder how you got along without it, especially if you do lots of edge banding or enjoy making cutting boards or butcher blocks. Both require numerous repetitive rips. This and my tenoning jig are likely the two most useful TS jigs I have in the shop. Material List: (to make two Jigs) "T" Square Section: Qty Item 2 2" x 5-3/4" x 3/4" T-handle 2 3/4" x 10" x 3/8" hardwood runner (to fit your TS miter gauge slot) 4 3/4" flat head screws (2) 2 5/16" x 2" Flat head machine screw. 2 2" dia. threaded Clamp Knob (to go on the machine screw). Featherboard Section: Qty Item 2 1" x 10" x 3/4" T-side. 4 5/16" x 1-1/2" x 3/4" Spacers (2) 1 7-1/16" x 10" x 3/4" ply. (good for 2 jigs) . Building Procedure: T-Square section: 1. Drill 5/16" hole into the runner 3-1/2" from Handle-end & counter-sink it. 2. Cut slit down the middle of the runner from the end up to the hole. 3. Pre-drill into runner for mounting to T-handle; 1/2" & 1-1/2" from handle-end & counter-sink. 4. Square the runner with the T-handle 1-1/2" from one end and attach the runner with two 3/4" screws. Featherboard Section: 1. Draw a diagonal line from corner to corner of 7-1/16" x 10" board and cut it. This will be good for two Jigs. 2. Draw the Feather lines 1/8" apart, 3" long, to take 3-1/2" of the corner. 3. Using the Band saw, cut on each Feather line. 4. Glue-up and Clamp: a. Dry fit... Place a Spacer at each end of the 10" T-side. b. Place non-feather side against the spacers (slot is formed for machine screw) c. Prepare the other Jig the same way so that the Feathered corner is diagonally opposite from the other feathered corner. This will form a full rectangle which will be easier to clamp. d. Assuming the Dry fit is OK, GLUE IT UP! e. Clamp, not too tight, across both Jigs to hold it all in place. 5. Put together and trim: a. Put 2" x 5/16" machine screw up through countersunk runner hole, through slot of a Featherboard, and screw-on the Clamp Knob. (do not tighten yet... just snug) b. Place in the miter gauge slot of Table saw... Tighten Knob to see if it holds tight. c. Adjust for a Kerf trim cut and make Trim cut up to the Feathered section. Ready to go! Enjoy! Feedback Q&A |
|
Links: Notes & Comments: 
 This site is maintained by: Good-Lyddon Data Systems Copyright © 2004-2005 Joe Lyddon, WoodWorkStuff.net |