|
|
In many respects, I like my clamp design better than a clamp screw or a C-clamp.
I admit that my clamp won't obtain the clamping pressure of a C-clamp, but
the throat is deeper and it won't leave a "frog eye" on the work piece.
Also, you can adjust it far more rapidly than either a clamp screw or a C-clamp.
You can make the clamp about as long as you want, although a maximum
realistic jaw opening is probably about 18".
That sure beats a C-clamp or a clamp screw.
Also, like the clamp screw, you can clamp round dowel stock,
which the C-clamp cannot do.
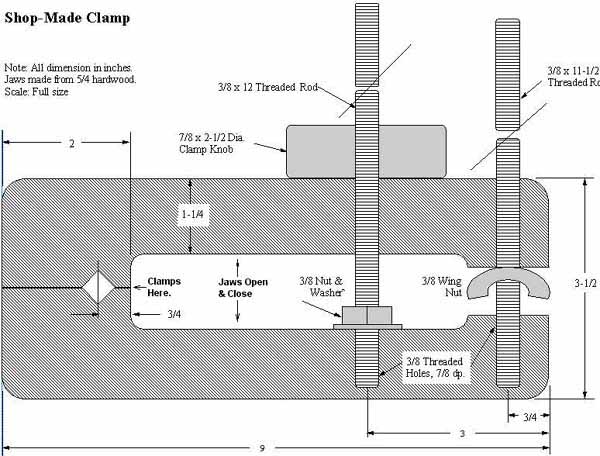
The plans I show yield an average-size clamp with jaws that can reach in about 5-1/2"
and open about 8" wide.
I made this with from one 24" length of threaded rod, a hex nut,
a washer, and a wing nut--all 3/8" stock.
The jaws are made from one piece of 5/4 hardwood that I cut from a
9" x 3-1/2" blank. I shaped the clamp knob from a cutoff scrap.
Before cutting the blank in half, Drill a pair of 3/8" dia.
holes for the threaded rod a little over halfway through its width.
Drill four 1/2" dia holes through its thickness to mark the rounded
corner positions of the interior cut outs.
Cut the blank in half, with the table saw,
dead center along its length.
Drill 5/16" blind holes for the threaded rods in the bottom
jaw, stopping just short of the bottom surface.
Route the V-groove on both jaws to allow clamping round stock and cut out the jaw opening
using the band saw.
Note: That extra clearance has to be provided for the wing nut on one end.
Thread the 5/16" blind holes with a 3/8" NC tap.
Cut and rounded the outside corners with the band saw and and used a 1/4"
roundover bit to eliminate all sharp edges on the inside and outside edges.
However, Do not round over the two clamping surfaces.
Cut the two threaded rods to length with the inside rod an inch longer and chamfered
all four ends.
Temporarily use a pair of jam nuts to set them tight into their blind holes in the lower
jaw.
The rod for the clamp knob needs a washer on the bottom jaw and a hex nut to hold it
tight, but the outer rod needs only a wing nut facing upward.
Make the clamp's spinner knob using 7/8" thick scrap stock by
simply cutting a round knob and threading a 5/16" hole in the center
using a 3/8" NC tap.
Spin sand the spinner on the drill press, removing the sharp edges.
Drop the top jaw into place and thread the spinner knob on,
adding a little wax or lithium grease to smooth out the spinning action.
Wax up the inside of the holes in the top jaw.
Finally, give the jaws and the knob a couple of coats of 20% thinned varnish to
seal the hardwood.
So, you are now ready to use the clamp.
Here's how it works.
Open the jaws wide enough and squeeze them by hand for a temporary snug fit.
Now spin the wing nut snug against the top jaw.
Use the spinner knob to clamp everything tight.
Note: The wing nut stops the backs of both jaws cold while the clamp knob does the
rest to apply the pressure.
I suggest that you make one to see if you like it.
Then make a bunch more of various sizes if you do. I did.
Cheers!
Edwin
|
|