|
|
I love this clamping jig and use it all the time.
I make frame and panel cabinet doors that require edge gluing their panels and their rails
and stiles during final assembly.
As an alternative to bar and pipe clamps, I designed and built another clamping jig that we
can make right in their own shop.
I also use this for cutting boards, door panels, and about any project that requires some
edge gluing.
My clamping jig consists of:
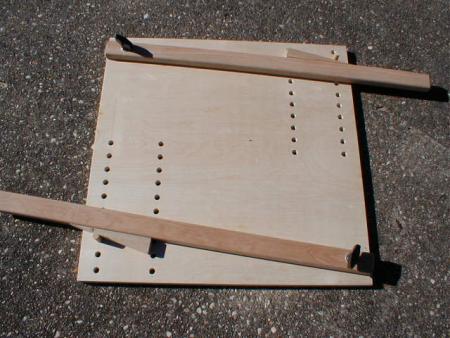
Two hardwood jaws that pivot at opposite corners of a plywood base.
The stock rests flat on the base and between the two jaws.
A wedge is tapped snugly behind the jaws and a dowel plug pressed into a
hole drilled into the base.
You get more even pressure along the entire length of the jaws.
This jig applies more evenly distributed pressure than with pipe or bar
clamps by themselves.
The clamped stock is also supported by the base and remains flat.
Let's Make it...
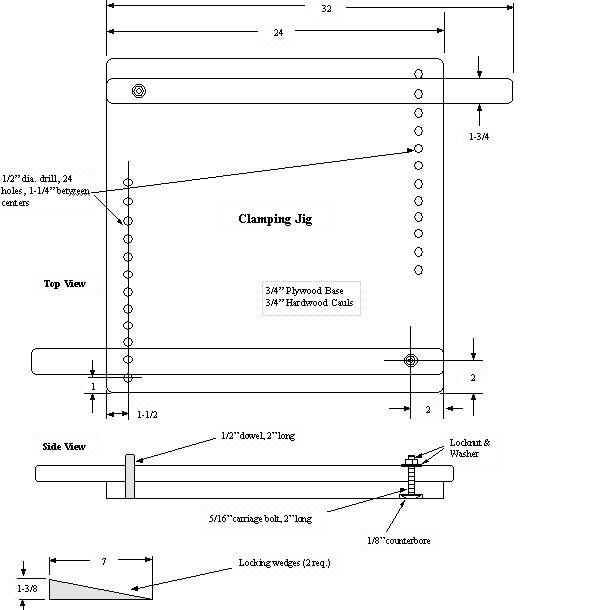
I made my jig using a 2' square, 3/4" plywood base.
Hardwood jaws are 32" long, 3/4" thick, and 1-3/4" wide.
Drill 1/2" dowel holes 1-1/4" apart along the sides of the base, starting 1"
from the end and 1-1/2" from the side of the base.
Important: Drill the holes accurately apart so that the jaws allow the
wedges to penetrate the same depth at each setting.
Drill ten holes on each side to ensure that the whole base will be used
to glue up stock of different widths.
The two holes closest to the center of the board should allow the wedges to
hold the jaws snug for storage.
Fine Points about the Jaws...
I fastened the jaws to the base using a 5/16" carriage bolt for a pivot.
Counter-bore the pivot holes 1/8" deep on the bottom.
Set the carriage bolt from the bottom up with a washer under a
common nut. Replace the common nut with a locknut to adjust the
jaws so that they do not swing too loosely.
Alternatively, drive the carriage bolt in from the bottom into the counterbored
hole, set it with a regular nut, and then replace that with a wing nut.
... or better yet, a 2" dia. shop-built hardwood spinner knob.
To use the jig...
Place a panel on the base and adjust the dowel plugs to position the jaws
as closely as possible while allowing some room for the wedges.
Press in both wedges and tap them in firm, alternating one to the other.
Although only two wedges are required, I made three of them.
When ready to unclamp, the third wedge can be used to loosen the others.
The jig, with the dimensions shown, can handle panels up to 18" wide
and about 36" long.
That takes care of practically every cabinet door I make.
If your panels are larger, just make a bigger square base and use longer
hardwood jaws.
I made a larger one...
36" x 36" wide with 42" jaws.
Four rows of holes for an additional pair of clamps nearer the
center of the platform.
Finally, add a second pair of holes about 6" closer to the center of
the board, even for the 24" x 24" medium jig.
The centerline location of the inside row will be limited by the drill press swing
depth.
You may want to adjust the centerline of that row so that it matches the
maximum reach from the center of the 1/2" drill bit to the column.
Many WWs have written back to me with this suggestion.
In that case, four wedges and four dowels are required.
One for each row of holes.
The second row of holes should probably be staggered or offset from the
outside row rather than aligned. The stagger pattern for the inside row of
holes would actually have to be a variable spacing between these holes IF you desired
that the two wedges penetrate exactly the same upon lockup. This requires
drawing a radius line from the center of each outside hole using the outside edge
of the 32" long cauls as they pivot. Then drill at the intersection of those
radius lines and the center line of the inside row.
When you do this, the spacing between each hole on the inside row is reduced
slightly as you move toward the center of the board. So you may want to
bump the constant spacing between the holes on the outside row by 1/8" or so.
(Not too much, however, or you might run away from the wedges on occasion).
Also, you would have to at least temporarily assemble the 32" cauls onto the
plywood board prior to drilling.
You might get by with 1/2" ply, provided you also glue a 3/4" batten
underneath each row of holes.
The dowels need a good reinforcing shoulder to remain vertical when the wedges are
tapped in, and you do not want that platform to bend.
Armed with these two clamping jigs, I have glued up over 200 panels (door frames
and door and chest panels, cutting boards, butcher block table tops, sides and tops of boxes,
etc.). There is no limit to what you can do--anything to avoid building with plywood
and edge trim... smirk! If you do a good job, you will have something useful for
the rest of your WW days.
Best, Edwin
p.s. Making those wedges on the TS is a challenge by itself without a jig of some
sort. I have designed a wedge-cutting jig for the TS that is used with the miter
gauge exactly for this purpose. An alternative to the TS is to use a band saw to
rough cut the wedges oversize and then plane the "washboard" edge smooth.
|
|