I know...   I know...
another sled.

By Mark Marzluf
January 2005


All these people posting pics of their new crosscut sleds was enough to kick me in the arse and go make a new one for myself...

Started it last night, finished this morning.

I know there's several of you out there that have fences that are just as nice.   I've seen the pics from time to time.

No...   it didn't take me all night.   I STARTED last night, went to bed, and then finished it this morning when I got up.   (I had to wait for the Gorilla glue to cure)

I still need to make the stop block for the fence and go get a hold down for the track in the bed but I'm pretty happy with it so far..


Here's an overview shot of it...
  • The bed is 3/4" particle board with
  • laminate top.   (left over from a kitchen counter job).  
  • Fences are left over Brazilian Cherry flooring that I glued up with a couple accent pieces.  
  • The one in the front rail is Aspen and the one in
  • the center of the guard block is Cocobolo.  


  • There is a block of wood in the middle of the front fence that the blade buries into once the cut is completed.
    THIS IS NOT A HANDLE.
    This keeps your hands away from the blade and amost impossible to get cut; unless you intentionaly push the sled completly past the safety block.
  • I've made it a practice of stopping the cut just as soon as the blade finishes cutting.   This has kept the saw kerf in the fence at a minimum height as you never have the entire height of the blade pass through it.
  • The Rear Fence.

  • The wood strip in the bed is one of
  • 3 zero clearance inserts that slip under the rear and front fence.  
  • Regular insert: ...for 1/8" blade kerf.
  • The Dado inserts: 1/2" and 3/4".  
  • The rear fence doesn't have to be ZCI (Zero Clearance Insert).   It's just to tie the two halves together.   Same as the front fence.
  • Yes...   I cut dados with my sled and that's why I made the three inserts.
  • My last sled didn't have them, just a 3/4" wide kerf down the middle.
  • I was always getting little cutoffs trapped in there so I promised myself that my next sled would deal with that issue better.   (course...   my last sled was just a piece of 1/2" ply and a 4x4 for the fence.   Figured I'd put a little more effort into this one.
  • Here's a shot of the track in the front fence.
  • I will make a stop block for it.  

  • I just used a cutoff scrap for my stop block.  
  • Just added a horizontal piece and drove in some 1/2" dowels.  


  • The T-track, parallel to the blade, is for a hold-down for when I have pieces too small to risk having my fingers in there.
  • I use a T-bolt for the T-track.
  • I used my dremel and a cut-off wheel to create a little slot in the track to slip the T-bolt into...   (not pictured)
  • Basically, I ground off the upper "lip" on both sides about 1" long or so.  
  • Not the clean look I wanted - but I knew I'd forget something when making this.   I always do.  
  • I also could have just taken the track off and cut it a little shorter, but I didn't want to take the rear fence off and take all the srews out of the track.
  • Only took about 5 min.   and I now have my hold down in place.   Used it today.  


  • It's still amazing to me
  • what you can do with scraps if you take the time to use them.
  • The only money I spent on this one was for the 2 T-tracks.   Everyhting else was on hand and had been sitting around for months...


  • I did find one issue with it though...
  • I put in one of the other inserts this evening and 1/2" worth of dado blade.
  • As I began to cut into the ZCI it started to shift left into the blade.  
  • They can't lift since they're tucked under both fences.  

  • A quick fix.
  • I drilled a 1/2" hole down through the front and rear fence
  • all the way into the inserts.  
  • Then sanded down a couple 1/2" dowels to fit the holes smoothly.  
  • Now I just put in the ZCI I need and
  • insert the two dowel pins esentially locking them horizontally in place.   Problem solved.   Still...   didn't like drilling into what I thought was a finished sled.
  • Here's how I solved the problem of the inserts sliding toward the blade...
  • 2 simple 1/2" dowels (with square knobs) that
  • run down through the front and rear fences and into the insert plates.  


    Works like a charm.

  • This is the 3/4" zero clearance dado insert installed.  
  • You can see the particle board under it.  
  • Each insert is 1/2" thick so there's plenty of support for the wider ones that over hang that PB shelf.  
  • Plus, with the new locking pins inserted, they don't move at all.  


  • I should get many years worth of good use out of this sled and it was a fun project...   I usually don't go this far for shop fixtures - but every once in a while it's nice to.


  • Not sure if I'm going to add the Lexan guard or not...   I never had one on my old sled that I've used for years..   Just seems to me it would get in the way.


  • An accurate sled is better than a pretty one any day.

  • Here is the last one I made - Do you believe it?   I've learned a lot over the last couple years.   None more important though than learning to stop rushing everything.   Now I think my patience is finally starting to pay off.

  • Of course...   I also found out tonight that my new pretty sled is OFF a bit...   I'll make an adjustment tomorrow to dial it in.
  • And...   if it makes you feel better - up until I made my new one - THIS is what I was using...   It's dead accurate.   I built it when I needed it, and at the time, pretty wasn't in my plan, or options like the hold down, and stop block tracks...   Just needed it to be square...


    Question:
    How does your first sled hold square without the rear fence? Looks like you have a 4x4 as the front fence and just ply as base.   Is that sufficient to hold the sled square and resist torsion when the blade hits the workpiece? I noticed the buried t-track on the base and wondering how to sneak a hold-down in?


    Answer:
    Oh...   sorry...   I had the rear fence off for a wide panel I did last week and never put it back on. Looks just like the front one though.

    Wrap up

  • The Finish...
  • Sanded to 220.  
  • Couple quick coats of wiped-on shellac.   Nothing special.  


  • Squaring the fence
  • Takes less time than typing the instructions.
  • Once you get your runners on -
  • place the sled on the TS...  
  • raise your blade and
  • cut through about 2/3 of your sled.  
  • That gives you a line to adjust to.  


  • Adding the fence can be done several ways..
  • I use a little different method than most I think...
  • When I'm putting my rails on,
  • I align the back of the sled with the rear of my TS top.  
  • I know that that it's 90 to the blade because I've checked.   So...   Once I'm ready to install the fence I know that if I line it up parallel to the rear of the sled - it's gona be pretty close to start with.  

  • Fence Attchment and Alignment...

  • I put 2 screws in.   One at each end of the fence up through the bottom.  
  • I make a test cut with some 1/2" scrap that's 8" wide and about 3' long.  
  • After cutting that piece in half,
  • flip one over so that the front edge is now the back edge and see how the kerf lines up.  

  • If the fence needs adjusting...
  • I leave one screw in,
  • remove the other screw and
  • move that end of the fence either forward or backward depending on which way it's off and then
  • put in a new screw...
  • but NOT in the same hole as used before.
  • Run another test cut and you should be good.  
  • If not - repeat the steps...
  • Once all is set - put in more screws to hold it firmly in place...


  • Again...   there are several different ways to do the fence alignment..  
  • You can also use a framers square
    (if you can find a square one) and
  • just lay it against your fence and
  • line it up with the cut you made 2/3 of the way through.

  • I did this method on my very first sled years ago and it wasn't bad but
  • that's when I found out my framing square wasn't square...
  • The test cut method won't lie to you... it
  • will show you EXACTLY how far off it is...  
  • The wider the test piece is - the more accurate you can get it...   just takes a little time.  

  • Paul Comi:
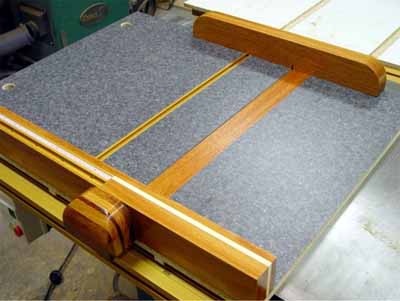
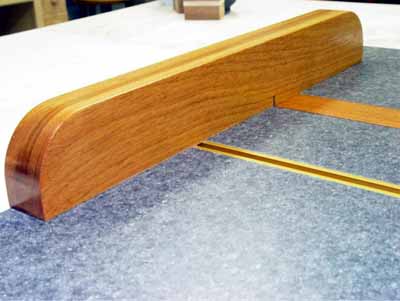
    That is beautiful.   It looks like a piece of furniture.   I have no experience with those hardwoods and they look great.   I just built one last month and I know the work and thought that goes into these things.   Seeing the finish and look of yours makes my maple and plywood sled look rather utilitarian, but one thing I like is that I won't be afraid to use it.   When I was building mine, I searched around and took inspiration from what 
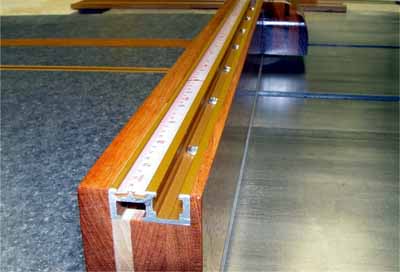
I saw others doing.   I like the way you dropped in the T-track and now others who follow will have yours to build off.   This is a cool forum.
    Edwin Hackleman:
    That's better than any cross-cut sled I have ever seen posted here, designed in a magazine, or sold anywhere.   Absolutely incredible!

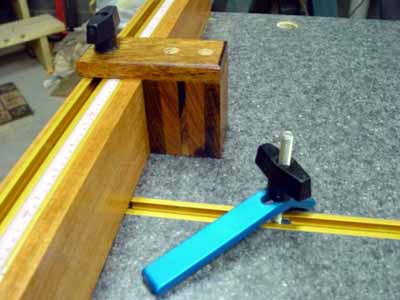
    Now make the adjustable stops for repetitive cuts to length, add a 45-degree miter jig, and don't forget the Lexan sheet to bridge the two fences...
    Joe Lyddon:
    Mark,

    OK with you if I add your new sled to my collection?

    Just about the time you think you've seen them all, someone like you changes everything!

    Very Nice!!

    Thank you for sharing another Masterpiece!!
    MMarzluf:
    No problem Joe...

    If it helps someone else make one - I'm always willing to help.

    Only problem now is - what am I going to do NEXT to impress you guys...

    Guess I'll finally have to make an aux drill press table.

    Mark


    This site is maintained by:
    Good-Lyddon Data Systems

    Copyright © 2004-2007 Joe Lyddon, WoodWorkStuff.net